Connect Camera via Network
You can connect a thermal camera by wired or wireless network to start live view, record videos, etc.
Only one thermal camera can be connected at a time in this way.
Prepare for Streaming
-
Connect your camera and PC to the same LAN network segment in wired or wireless way.
NoteFor a handheld camera/imager, DHCP is enabled by default, in which IP address for the camera is automatically assigned by routers or switch. View the IP address of the camera from its menu .
To view and edit the IP address of your PC, take Windows10 as an example, go to .
-
For activated camera that has been connected to the Client or mobile APP via the network, the login password set during camera activation should be obtained in advance.
-
The WinPCap driver has been installed in the PC. For more information, please refer toSoftware Installation and Software Upgrade.
First-Time Network Connection (Camera not Activated)
-
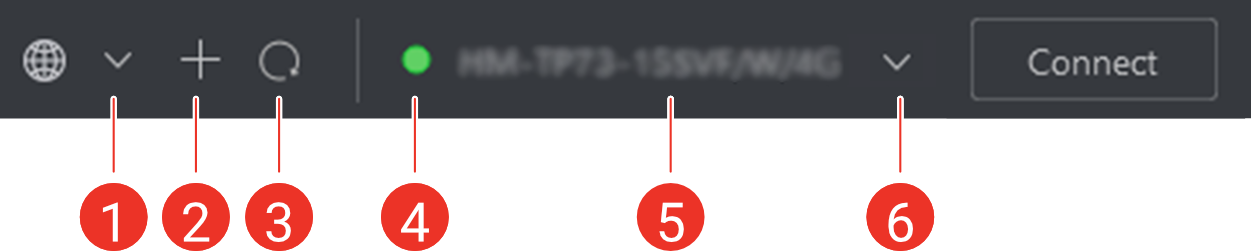
Click (1) in the upper-left corner of the live panel, and select Network Connection.
-
Click (6) to open the online camera list and view the detected cameras.
NoteIf you can not find your camera in the list, click Refresh (3).
-
Select the camera based on the model and serial number, and then click Activation.
-
Input and confirm the login password as required.
-
Click Advanced Settings to modify the IP Address, Subnet Mask, and Gateway, or check DHCP to have the router dynamically assign these parameters.
Note-
If the activation succeeds but the Advanced Settings configuration fails, the Client will automatically switch to DHCP mode to ensure network access.
-
If a fixed IP address is required, you can try resetting the device and reactivating it to set advanced parameters.
-
-
Click Activate.
-
Enable Network Access on your device.
NoteFor new devices whose network access function is disabled by default, when the client detects its disabled status, it will send an on-screen prompt for you to enable the function quickly.
-
Click to start live view.
 (1) in the upper-left corner
of the live panel, and select
Quick Connect to the Last Connected Camera
The model name (5) of the last connected camera is displayed in the camera name bar. The color of the dot (4) indicates the connection status.
-
The green dots means that the camera is online and has been automatically logged in. You can click Connect to start live view.
-
For dots of other colors, you can hover the mouse over the model name (5) to view the camera's IP address, model name, serial number, and connection status.
Connect to Other Online Cameras
-
Open the online camera list (6).
-
Select the camera you need to connect to and click Connect.
-
Input the login password and click OK to start live view.
Note-
The Client automatically save the login password of the camera based on the serial number. Start the live view without re-inputting the password, if the camera has been successfully connected to the Client before.
-
Automatic login to the camera is not supported after switching computer accounts.
-
If you forget the password, click Forgot Password in the pop-up window to view the guidance.
-
Manual Input Network Parameters to Login to an Activated Camera
-
Click (2) to open the manual connection window.
-
Input the camera's IP address, port, user name, and password, and click OK to login and connect to the camera for live view.
NoteIf you forget the password, click Forgot Password in the pop-up window to view the guidance.
 (2) to open the manual
connection window.